Export Contacts, Microsoft Outlook, Gmail, FreshBooks
Export Contacts
When you export your contacts from Outlook, a copy of your contacts is saved to a CSV file, or other file type. You can then use this file to import your contacts to another email account.
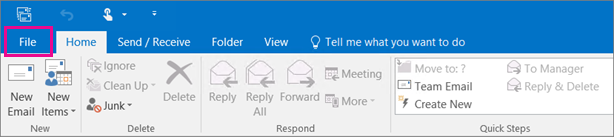
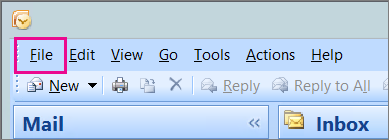
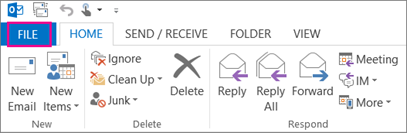
- In Outlook 2013 or 2016 on a PC, choose File.If your ribbon doesn’t have a File option in the top left corner, you’re not using Outlook 2016 or 2013. See What version of Outlook do I have? to get to the export instructions for your version of Outlook.
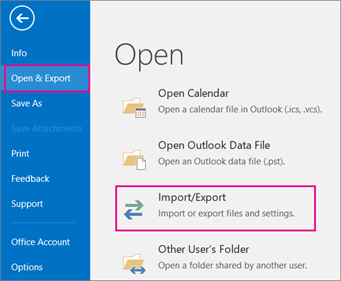
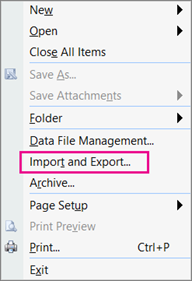
- Choose Open & Export > Import/Export.
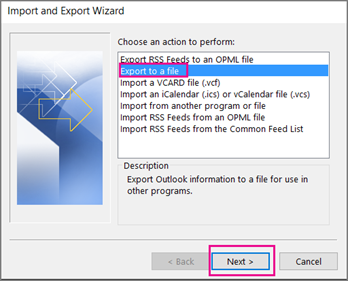
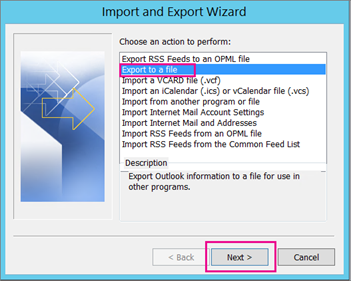
- Choose Export to a file.
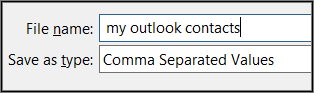
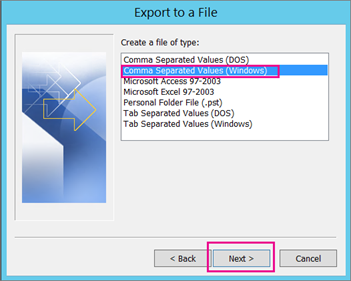
- Choose Comma Separated Values.
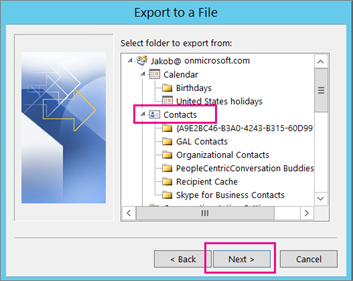
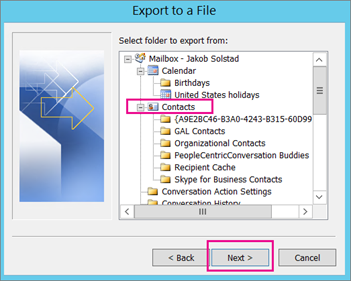
- THIS STEP IS KEY especially if you’re borrowing a friend’s computer: In the Select folder to export from box, scroll to the top if needed and select the Contacts folder that’s under your account. Choose Next.
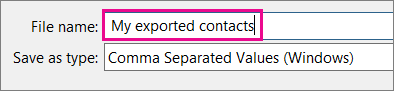
- Choose Browse, name your file, and choose OK.
- Confirm where your new contacts file will be saved on your computer, and choose Next.
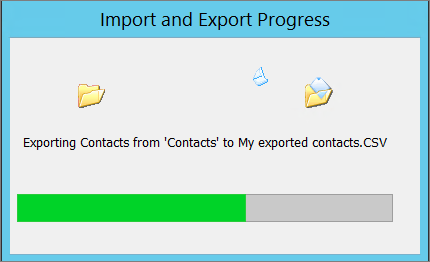
- Choose Finish to start exporting your contacts immediately. Outlook doesn’t display any message when the export process is complete but the Import and Export Progress box goes away.
- Locate the new .csv file on your computer and open it with Excel to verify your contacts are there. You’ll likely have a lot of empty cells. That’s normal.

- Generally we recommend closing the file without saving any changes; otherwise the file might get messed up and you won’t be able to use it for importing. If that happens you can always run the export process again and create a new file.You can use Excel to update the information in your .csv file. For tips about working with a list of contacts in Excel, see Create or edit .csv files.
- If you borrowed a friend’s computer with Outlook on it, you can now remove your account from his version of Outlook. Here’s how:
- In Outlook on the desktop, choose File > Account Settings > Account Settings.
- Choose the account you want to delete, and then choose Remove.
- Choose Close.
- Now that your contacts are copied to a .csv file, you can import them to another computer with Outlook for Windows on it, or import them to another email service.
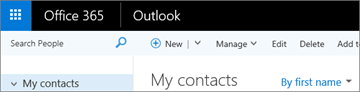
If you have an Office 365 mailbox, you can access it over the Internet, just like you sign in to Facebook, Gmail, or Amazon. It looks like this:
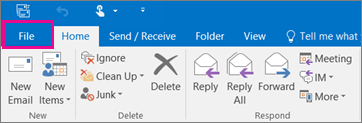
To export your contacts from your Office 365 mailbox, you need to use the Outlook app, such as Outlook 2016, 2013, 2010, or 2007. When you launch the Outlook app, you’ll see “File” in the top left corner:
To export your Office 365 email contacts:
- Add your Office 365 email account to the Outlook app.The Outlook app will sync with your Office 365 mailbox. After a while, you’ll see a copy of your email and contacts in the Outlook app.
- Export a copy of your contacts from the Outlook app, using the instructions in this article for your version of Outlook.
-
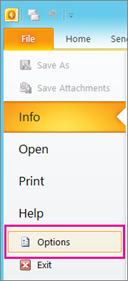
At the top of your Outlook 2010 ribbon, choose the File tab.
If your ribbon doesn’t have a File option in the top left corner, you’re not using Outlook 2010. See What version of Outlook do I have? to get to the import instructions for your version of Outlook.

- Choose Options.
- In the Outlook Options box, choose Advanced.
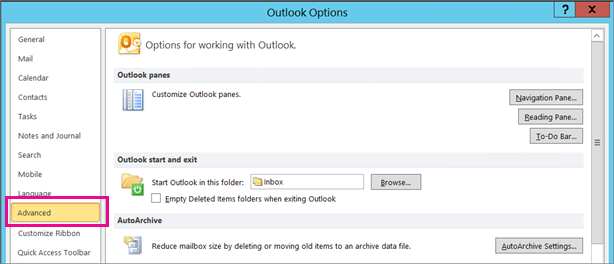
- Under the Export section, choose Export.

- In the Import and Export Wizard, select Export to a file, and then choose Next.
- Under Create a file of type, choose the type of export that you want. The most common is Comma Separated Values (Windows), also known as a .csv file. Then click Next.
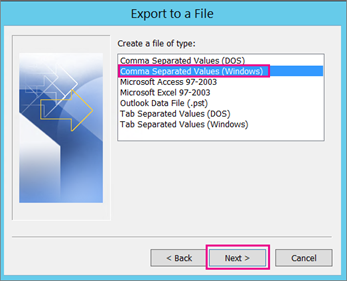
If you are exporting contacts for use in another copy of Outlook, choose an Outlook Data File (.pst).
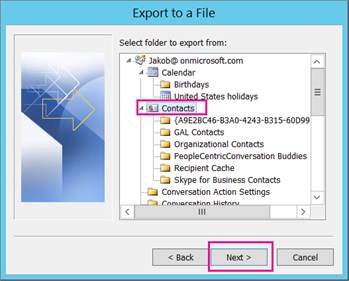
- Under Select folder to export from, you may need to scroll up, and then select the contact folder that you want to export. Choose Next when you’re done.
Note: Unless you chose to export to an Outlook Data File (.pst), you can only export one folder at a time.
- Under Save exported file as, click Browse, select a destination folder, and in the File name box, type a name for the file.
- Click OK.
- In the Export to a File dialog box, click Next.
- Choose Finish to start exporting your contacts immediately. Outlook doesn’t display any message when the export process is complete but the Import and Export Progress box goes away.
- When the export is finished, choose OK to exit the Outlook Options box.
- Go to the location on your computer where you saved your contacts, for example, in the Documents folder.
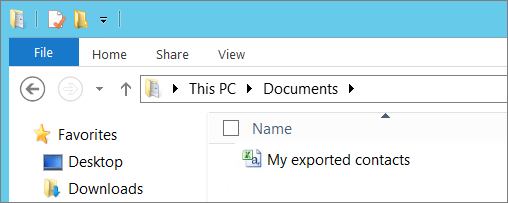
- If you exported your contacts as a .csv file, you can use Excel to see what was exported from Outlook. You’ll likely have a lot of empty cells. That’s normal.
- Generally we recommend closing the file without saving any changes; otherwise the file might get messed up and you won’t be able to use it for importing. If that happens you can always run the export process again and create a new file.You can use Excel to update the information in your .csv file. For tips about working with a list of contacts in Excel, see Create or edit .csv files.
-
In Outlook 2007, at the top of your ribbon choose File.
If your ribbon doesn’t have a File option in the top left corner, you’re not using Outlook 2007. See What version of Outlook do I have? to get to the import instructions for your version of Outlook.
- Choose Import and Export.
- Select Export to a file, and then click Next.
- Choose Comma Separated Value, and then click Next.
- In the folder list, scroll up if needed and choose the contacts folder you want to export, and then click Next.
- Choose Browse, type a name for the exported file, and then click OK.
- Click Next.
- Choose Finish to start exporting your contacts immediately. Outlook doesn’t display any message when the export process is complete but the Import and Export Progress box goes away.
- If you exported your contacts as a .csv file, you can use Excel to see what was exported from Outlook. You’ll likely have a lot of empty cells. That’s normal.
-
Generally we recommend closing the file without saving any changes; otherwise the file might get messed up and you won’t be able to use it for importing. If that happens you can always run the export process again and create a new file.
You can use Excel to update the information in your .csv file. For tips about working with a list of contacts in Excel, see Create or edit .csv files.
Export Gmail contacts
- From your Gmail account, choose Gmail >Contacts
- Select More >Export.
- Choose the contact group you want to export.
- Choose the export format Outlook CSV (for importing into Outlook or another application).
- Choose Export.
- When prompted, choose Save As, and browse to a location to save the file.
Note: Google does not export the photos of your contacts.

Fixing issues with importing Gmail contacts
- You get an error message: If you try to import more than 2000 contacts at a time, you’ll see an error message. Use a program such as Excel to open the CSV file, separate your list of contacts into smaller .csv files, and then import each newly created CSV file.
- No contacts appear in Outlook: If you complete the import process but no contacts appear in Outlook, do the following:
- Locate the csv file you exported from Google. The default file name is contacts.csv.
- Use Excel to open the CSV file you exported from Google.
- Check whether there is any information in the CSV file. If there isn’t any information in the CSV file, the export from Google didn’t work. In that case:
- Delete the contacts.csv file.
- Export your contacts from Google again. Be sure to choose to export All contacts, or the right group of contacts.
- After you export your contacts, use Excel to open the CSV file and check that there’s data. When you close the file, Excel will prompt you a few times with “are you sure you want to save it in CSV format?” Always choose Yes. If you choose No, the file will get messed up and you’ll need to start over with a new contacts.csv file.
- Repeat the steps to import your contacts.csv file to Outlook.
- Contacts are missing info: After you import your contacts, if you open Outlook and see that not all the info was imported, open the CSV file with Excel to see if the information was there.
- You can edit the CSV file using Excel to add names and other missing information.
- Outlook requires the column headings in the first row so don’t replace them with something else.
- When you save the CSV file, Excel will prompt you a few times with “are you sure you want to save it in CSV format?” Always choose Yes. If you choose No, the file will get messed up and you’ll need to start over again by exporting the list from Gmail.
- Repeat the steps to import your contacts.csv file to Outlook. In step 5, when prompted out to handle duplicates, be sure to choose Replace duplicates with items imported.
Import Gmail contacts to Outlook 2013 or 2016
- Choose File > Open & Export > Import/Export.
- Choose Import from another program or file > Next.
- Choose Comma Separated Values > Next.
- In the Import a File box, browse to choose the .csv file you saved your Gmail contacts to.
- Choose how you want Outlook to handle duplicate contacts > Next .
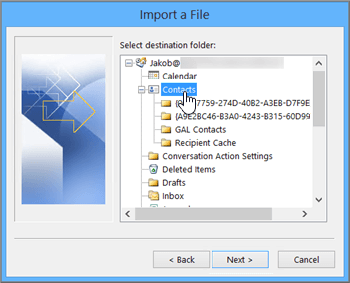
- In the Select a destination folder box, scroll to the top if needed and select the Contacts folder > Next.
- Choose Finish.Outlook imports your contacts to Outlook.
Fixing issues with importing Gmail contacts
- You get an error message: If you try to import more than 2000 contacts at a time, you’ll see an error message. Use a program such as Excel to open the CSV file, separate your list of contacts into smaller .csv files, and then import each newly created CSV file.
- No contacts appear in Outlook: If you complete the import process but no contacts appear in Outlook, do the following:
- Locate the csv file you exported from Google. The default file name is contacts.csv.
- Use Excel to open the CSV file you exported from Google.
- Check whether there is any information in the CSV file. If there isn’t any information in the CSV file, the export from Google didn’t work. In that case:
- Delete the contacts.csv file.
- Export your contacts from Google again. Be sure to choose to export All contacts, or the right group of contacts.
-
After you export your contacts, use Excel to open the CSV file and check that there’s data. When you close the file, Excel will prompt you a few times with “are you sure you want to save it in CSV format?” Always choose Yes. If you choose No, the file will get messed up and you’ll need to start over with a new contacts.csv file.
- Repeat the steps to import your contacts.csv file to Outlook.
- Contacts are missing info: After you import your contacts, if you open Outlook and see that not all the info was imported, open the CSV file with Excel to see if the information was there.
- You can edit the CSV file using Excel to add names and other missing information.
- Outlook requires the column headings in the first row so don’t replace them with something else.
- When you save the CSV file, Excel will prompt you a few times with “are you sure you want to save it in CSV format?” Always choose Yes. If you choose No, the file will get messed up and you’ll need to start over again by exporting the list from Gmail.
- Repeat the steps to import your contacts.csv file to Outlook. In step 5, when prompted out to handle duplicates, be sure to choose Replace duplicates with items imported.
View your contacts in Outlook
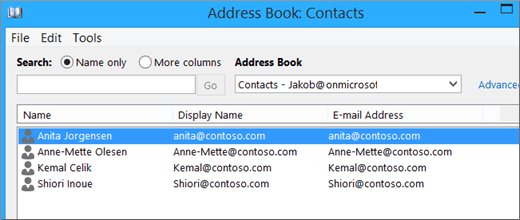
- In Outlook, select Address Book, choose the name of your mailbox, and choose Contacts.

- You’ll see your list of contacts in the Address Book.
Fixing issues with importing Gmail contacts
- You get an error message: If you try to import more than 2000 contacts at a time, you’ll see an error message. Use a program such as Excel to open the CSV file, separate your list of contacts into smaller .csv files, and then import each newly created CSV file.
- No contacts appear in Outlook: If you complete the import process but no contacts appear in Outlook, do the following:
- Locate the csv file you exported from Google. The default file name is contacts.csv.
- Use Excel to open the CSV file you exported from Google.
- Check whether there is any information in the CSV file. If there isn’t any information in the CSV file, the export from Google didn’t work. In that case:
- Delete the contacts.csv file.
- Export your contacts from Google again. Be sure to choose to export All contacts, or the right group of contacts.
-
After you export your contacts, use Excel to open the CSV file and check that there’s data. When you close the file, Excel will prompt you a few times with “are you sure you want to save it in CSV format?” Always choose Yes. If you choose No, the file will get messed up and you’ll need to start over with a new contacts.csv file.
- Repeat the steps to import your contacts.csv file to Outlook.
- Contacts are missing info: After you import your contacts, if you open Outlook and see that not all the info was imported, open the CSV file with Excel to see if the information was there.
- You can edit the CSV file using Excel to add names and other missing information.
- Outlook requires the column headings in the first row so don’t replace them with something else.
- When you save the CSV file, Excel will prompt you a few times with “are you sure you want to save it in CSV format?” Always choose Yes. If you choose No, the file will get messed up and you’ll need to start over again by exporting the list from Gmail.
- Repeat the steps to import your contacts.csv file to Outlook. In step 5, when prompted out to handle duplicates, be sure to choose Replace duplicates with items imported.
How do I export data out of FreshBooks?
Click on any of the below for specific steps:
- Clients & Staff
- Invoices
- Items & Expense Receipt Images
- Reports
Clients & Staff
- Go to My Account (top corner)
- Click on the Import & Export sub-tab
- Click on the Comma Separated File (CSV) next to Export Clients, Invoices, Staff and Timesheets
- Click on either Clients or Staff to download
- A CSV file will download.
Invoices
There are two ways to download invoices – as a CSV file or as PDFs:
CSV File:
- Go to My Account (top corner)
- Click on the Import & Export sub-tab
- Click on the Comma Separated File (CSV) next to Export Clients, Invoices, Staff and Timesheets
- Click on Invoices to download
- A CSV file will download to your computer.
PDF:
- Go to the Invoices tab
- At the bottom corner, click on the all x pages link (x equaling whatever total pages you have)
- Check the box next to Invoice at the top of the list (all invoices should be selected)
- Click the Print button
- All Invoices will download as PDFs to your computer.
Reports
Go to the Reports tab in your FreshBooks account and run any report you need. There will be an Export to button in the top right corner of the report to save it as an Excel or CSV file.