Mail Merge: Microsoft Word, Excel, Outlook, Google Docs
Need help with mail merge? In this article, you’ll learn how to use mail merge for Microsoft word, excel, outlook, and Google Docs. We’re going to walk you through everything that you need to know about mail merge.
What is Mail Merge?
In most applications that allow users to process data, mail merge is simply a feature that makes it possible to send a letter or document to multiple recipients. Think about it this way, you can connect a single form that has data about the recipient’s name, address, and other data that is supported. You can use mail merge for Microsoft Word, Excel, Outlook, Google Docs, etc.
The Benefits of Mail Merge
Mail merge makes it easier for you to send a written or emailed message to multiple recipients. If you had to create one letter at a time for each recipient, it would take you a very long time. So, mail merge just makes it a lot easier for you to send mail to multiple recipients without much manual effort.
Mail Merge in Microsoft Word 2007
On the Mailings tab, click Start Mail Merge, and then click Step by Step Mail Merge Wizard.
Select document type
In the Mail Merge task pane, click Letters. This will enable you to send letters to a group of individuals and individualize the results of the letter that each individual receives.
Click Next: Starting document.
Choose the starting document
- Click on one of the following options :
- Use the current document: Use the currently open document as your primary document.
- Start with a template: Select one of the ready-to-use mail merge templates.
- Start from existing document: Open an existing document to use as your mail merge main document.
- In the Mail Merge task pane, click Next: Choose recipients.
Choose recipients
Whenever you open up or generate a data source by utilizing the Mail Merge Wizard, you are actually informing Word to make use of a particular set of variable information for your merge. Use one of the following techniques to attach the primary document to the data source.
Method 1: Use a pre-existing data source
To use a pre-existing data source, follow these steps :
- In the Mail Merge task pane, click Use an existing list.
- In the Use, an existing list section, click Browse.
- In the Select Data Source dialog box, select the file that contains the variable information that you want to use, and then click Open.
Note If the data source is not shown in the list of files, choose the suitable drive and folder. If needed, pick the appropriate option in the All Data Sources list. Select the file, and then click Open.
- Word shows the Mail Merge Recipients dialog box. You can sort and edit your data if you want to.
- Click OK to return to the main document.
- Save the primary document.
Whenever you save the primary document at this point, you are also saving the data source and attaching the data source to the main document.
Type the name that you would like to give to your main document, and then click Save.
Method 2: Use names from a Microsoft Outlook Contacts List
To use an Outlook Contact List, follow these steps :
- In the Mail Merge task pane, click Next: Select recipients.
- Click Select from Outlook contacts.
- In the Select from Outlook contacts section, click Choose Contacts Folder.
- In the Select Contact List Folder dialog box, select the Outlook contacts folder that you want, and then click OK.
Word displays the Mail Merge Recipients dialog box. You can sort and edit your data if you want.
Click OK to return to the main document.
Method 3: Create a database of names and addresses
To create a new database, follow these steps :
In the Mail Merge task pane, click Next: Select Recipients.
Click Type a new list.
Click Create.
The New Address List dialog box appears. In this dialog box, enter the address information for each and every record. Should there be no information for a specific field, leave the box blank.
By default, Word skips blank fields. Consequently, the merge is not impacted if blank entries are in the data form. The set of information in each form makes up one data record.
After you type the information for a record, click New Entry to move to the next record.
To delete a record, click Delete Entry. To search for a specific record, click Find Entry. To customize your list, click Customize. In the Customize Address List dialog box, you can add, delete, rename, and reorder the merge fields.
In the New Address List dialog box, click OK. In the Save Address List dialog box, type the name that you want to give to your data source in the File name box, and then click Save.
- In the Mail Merge Recipients dialog box, make any changes that you want and then click OK.
- Click Next: Write your letter to finish setting up your letter.
- Save the main document.
When you save the main document at this point, you are also saving the data source and attaching the data source to the main document.
Type the name that you want to give to your main document, and then click Save.
- To move on to the next step, click Next: Write your letter.
- Write your letter
- In this step, you set up your primary document.
- Type or add any text and graphics that you want to incorporate into your letter.
- Add the field codes where you want the variable information to appear. In the Mail Merge task pane, you have four options :
- Address block: Use this option to insert a formatted address.
- Greeting line: Use this option to insert a formatted salutation.
- Electronic postage: Use this option to insert electronic postage.
Note This option requires that you have a postage software program installed on your computer.
More items: Use this option to insert individual merge fields. When you click More Items, the Insert Merge Field dialog box appears.
Note Ensure that your cursor is where you would like to insert the information from your data source before you click More Items.
In the Insert Merge Field dialog box, click the merge field that you would like to use, after which click Insert.
Note You can insert all of your fields and then go back and add any spaces or punctuation. On the other hand, you could insert one field at a time, close the Insert Merge Fields dialog box, add any specific spaces or punctuation that you want, and then repeat this step for each further merge field that you want to insert. You can also format ( apply bold or italic formatting too) the merge fields, just like regular text.
When you finish editing the main document, click Save or Save As on the File menu.
Note In Word 2007, click the Microsoft Office Button, and then click Save or Save As.
Name the file, and then click Save. To move on to the next step, click Next: Preview your letters.
Preview your letters
This step enables you to preview your merged data, one letter at a time. You may also make changes to your recipient list or customize individual letters.
- To go to the next step, click Next:
- Complete the merge.Complete the merge
- This step merges the variable information with the form letter. You can output the merge result by using either of the following options:
Print: Choose this option to send the merged document straight to the printer. You will not be able to view the document on your screen.
When you click Print, the Merge to Printer dialog box appears. In the Merge to Printer dialog box, you could choose which records to merge. When you click
OK, the Print dialog box appears. Click Print to print the merge document.
Edit individual letters: Select this option to show the merged document on your screen.
Whenever you click Edit individual letters, the Merge to New Document dialog box appears. In the Merge to New Document dialog box, you can choose which records to merge. When you click OK, the documents are merged into a new Word document.
To print the file, on the File menu, click Print.
Note In Word 2007, click the Microsoft Office Button, and then click Print.
Mail Merge in Microsoft Word 2010
In Word 2010, mail merging consists of opening up a single Word document, stirring in a list of particular names as well as other information, and then mixing ( merging ) everything. The most typical thing to mail-merge is the regular, annoying form letter, which you could then print and send out.
Step 1: Start a new, blank document.
Start a new, blank document.
You can use the keyboard shortcut Ctrl+N.
Step 2: On the Mailings tab, from the Start Mail Merge group, select Start Mail Merge→Letters.
Type the letter. You’re writing merely the typical parts of the letter, the text that doesn’t change for each copy you print.
Step 3: Type the fields you need in ALL CAPS.

You don’t really have to type this info in ALL CAPS, however, it enables you to locate fairly easily the text to be changed or personalized in your document. Use short, descriptive terms.
Step 4: Save the main document.
You can save by using the keyboard shortcut Ctrl+S.
Step 5: On the Mailings tab, in the Start Mail Merge Group, choose Select Recipients→Type New List.

If this choice isn’t available, you haven’t properly developed the primary document. Otherwise, you see the New Address List dialog box.
Word presumes that you require a dozen or so fields for your mail merge, which happens to be silly yet a number you have to work with. So the following steps eliminate the fields you don’t need in your document and substitute them with the fields your document requires.
Step 6: Click the Customize Columns button.

The Customize Address List dialog box shows up, presenting fields that Word presumes you need. Such foolishness should not be tolerated.
Step 7: Select a field that you don’t need and click the Delete button.
A confirmation dialog box appears.
Step 8: Click Yes in the confirmation dialog box.
The dialog box closes, and the unnecessary field disappears.
Step 9: Repeat Steps 8 and 9 for each field you don’t need.
After getting rid of the unnecessary fields, the next step is to add the fields you need — if any.
Step 10: To add a field that’s needed in your document, click the Add button.

The small Add Field dialog box pops into view.
Step 11: Type the field name and click the OK button.
Name the field to reflect the kind of information in it.
Step 12: Repeat Steps 11 and 12 for each new field you need in your main document.
As soon as you’re finished, evaluate the list. It should go with the list of ALL CAPS fields in your document ( if you chose to produce them). Don’t be concerned if it doesn’t — you can add fields later, even though it takes a longer time.
Step 13: Click OK.
You should now be able to see the customized fields appear as column headings in the New Address List dialog box.
Now, you’re ready to add the recipient list.
Step 14: Type the record’s data.
Type the information that’s correct to each field: a name, a title, etc.
Step 15: Press Tab to enter the next field.
After filling in the last field, you may want to add another record.
Step 16: To add a new record, press the Tab key after inputting the last field.
Whenever you press the Tab key on the last field in a record, a new record is automatically created and added on the next line.
Step 17: Repeat Steps 15 through 17 until you enter all the records you want.
Continue adding data
Step 18: Review your work when you’re done.
You can edit any field in any record by selecting it with the mouse.
Step 19: Click OK.

A Save As dialog box pops up, enabling you to save the recipient list.
Step 20: Type a name for the address list.
Try to use names that are descriptive. Besides, you might use the same recipient list again.
Step 21: Click the Save button.
You return to your document. The subsequent step in your mail-merge anguish is to stir the fields from the recipient list into the primary document.
Step 22: Choose a field placeholder in the main document.
If you did use ALL CAPS placeholders to insert fields in your document, you should have no problem finding them
Step 23: Click the Insert Merge Field command button.
The Insert Merge Field menu should appear, showing fields based upon the recipient list associated with the primary document.
Step 24: Select the proper field to insert into your text.
For instance, if you’re replacing the text FIRST in your document with a First field, choose the First field from the Insert Merge Field menu. The field is inserted into your document and replaces the ALL CAPS text.
Step 25: Keep on adding fields until the document is complete.
Repeat Steps 23 through 25 as necessary to stick all fields into your document.
Step 26: Save the primary document.
The most typical destination for merged documents is the printer. The entire printing process is quite easy
Step 27: Choose Finish & Merge→Print Documents.
The Merge to Printer dialog box appears, from which you can choose records to print.
Step 28: Select All to print your entire document.
On the other hand, you can stipulate which records to print.
Step 29: Click OK.
The conventional Print dialog box appears.
Step 30: Click the OK button.
Your documents print.
Step 31: Save and close your document.
That’s it, your mail merge journey come to an end!
Mail Merge in Word 2011 For Mac

With Office 2011 for Mac, your guidebook to mail merging in Word is Mail Merge Manager. You can invoke Mail Merge Manager by selecting Tools→Mail Merge Manager from the menu bar. It’s created to be utilized starting at the top in Step 1, and you then progress down to Step 6.
The steps in the Mail Merge Manager are as follows:
Step 1: Choose a Document Type.
You can choose from four types of mail merge:
* Form Letters: Customize a letter with personal information or data.
* Labels: Make mailing labels, tent cards, book labels, and DVD labels.
* Envelopes: Print envelopes of any size.
* Catalog: Select this option if you want to build custom, personalized catalogs, brochures, and price sheets. For instance, you could get pictures from a database that could then be used to develop individualized custom catalogs based on customer purchases, category, or some other specified criteria.
Step 2: Select Recipients List.
Choose a source to pull data from for the mail merge
Step 3: Insert Placeholders.
Choose the field names (As an example, column names, headers, and column headers) and position them in your document.
Step 4: Filter Recipients
Set rules as to the particular kind of records that should be pulled from the data source.
Step 5: Preview The Results
See precisely how your document looks with data before running the mail merge.
Step 6: Finish The Mail Merge
Start the merge. You have the option to merge to a printer, a single Word document, personalized Word documents, or e-mail messages.
Mail Merge Word 2013
To use Mail Merge:
- Open an existing Word document, or create a new one.
- From the Mailings tab, click the Start Mail Merge command and select Step by Step Mail Merge Wizard from the drop-down menu.
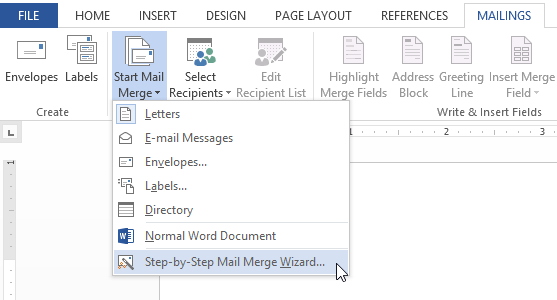
The Mail Merge pane shows up and will assist you through the six primary steps to carry out a merge. The following instance shows how to produce a form letter and merge the letter with a recipient list.
Step 2:
- Select the kind of document that you would like to create. In our example, we’ll choose Letters. Then click Next: Starting document to move to Step 2.
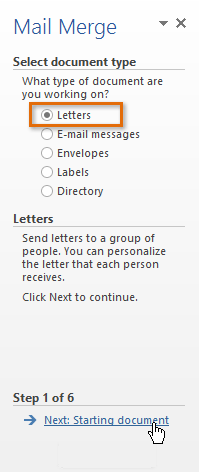
Step 2:
- Select Use the current document, then click Next: Select recipients to move to Step 3.
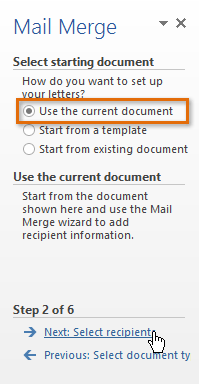
Step 3:
Now you’ll need an address list so Word can automatically add each address into the document. The list can be from an existing file, such as an Excel workbook, or you can type a new address list from within the Mail Merge Wizard.
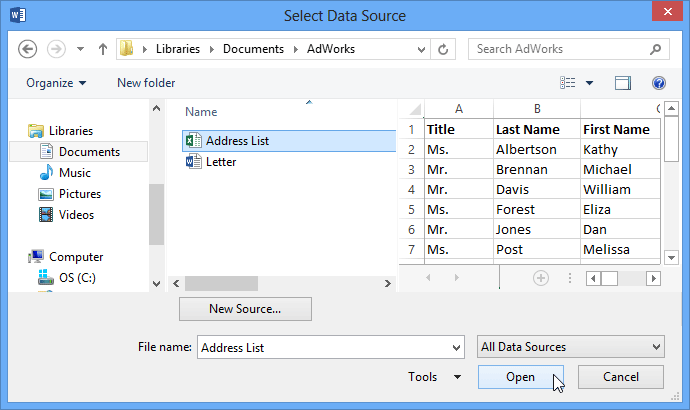
- From the Mail Merge task pane, select Use an existing list, then click Browse… to select the file.
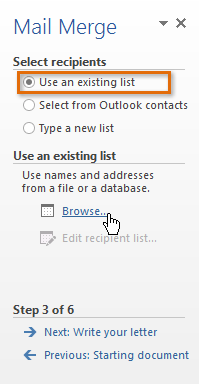
2. Locate your file and click Open.
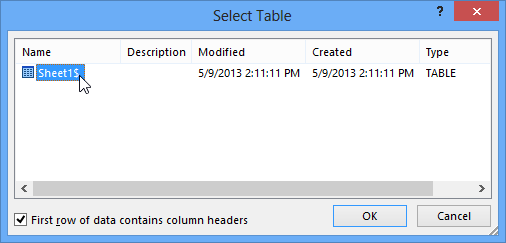
3. If the address list is in an Excel workbook, select the worksheet that contains the list and click OK.
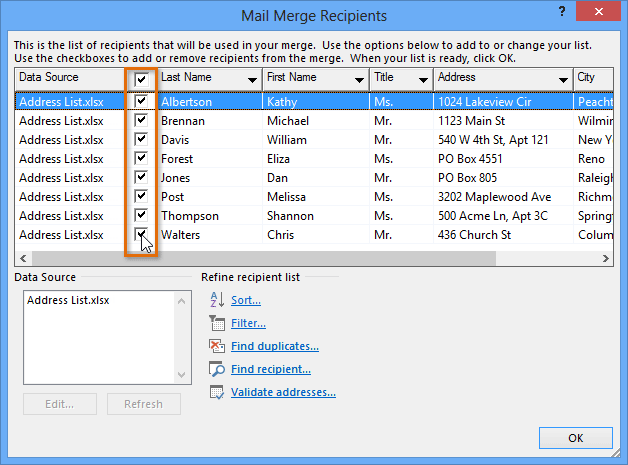
4. In the Mail Merge Recipients dialog box, you can check or uncheck each box to control which recipients are included in the merge. By default, all recipients should be selected. When you’re done, click OK.
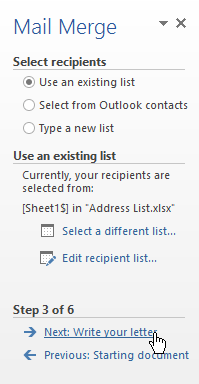
5. From the Mail Merge task pane, click Next: Write your letter to move to Step 4.
Step 4: Write Your Letter
To insert recipient data:
- Place the insertion point in the document where you want the information to appear.
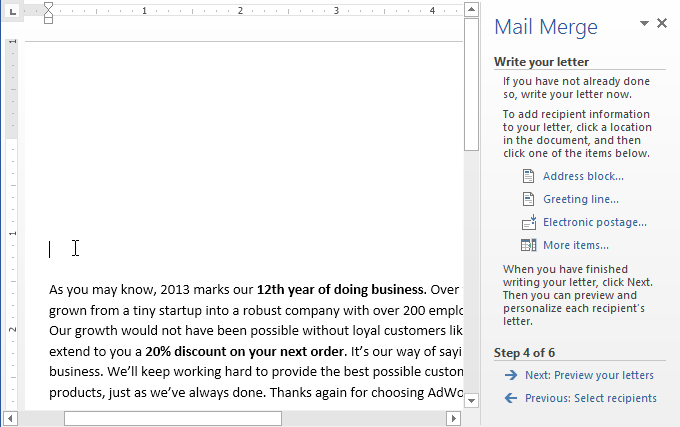
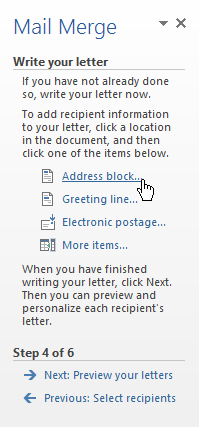
2. Choose one of the four placeholder options: Address block, Greeting line, Electronic postage, or More items.
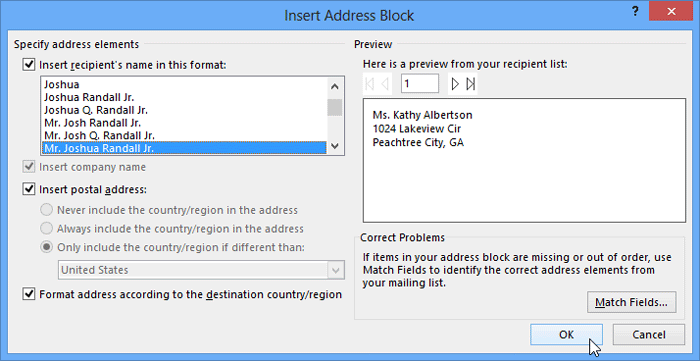
3. Depending on your selection, a dialog box may appear with various options. Select the desired options and click OK.
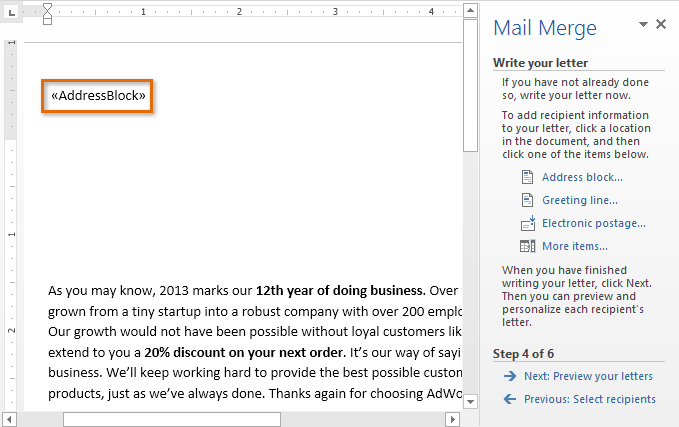
4. A placeholder will appear in your document (for example, «AddressBlock»).
5. Repeat these steps each time you need to enter information from your data record. In our example, we’ll add a Greeting line.
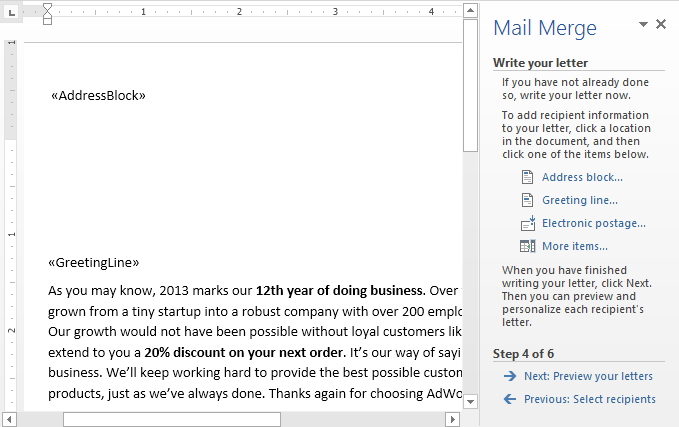
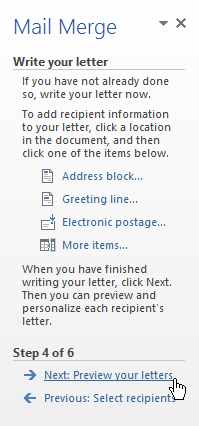
6. When you’re done, click Next: Preview your letters to move to Step 5.
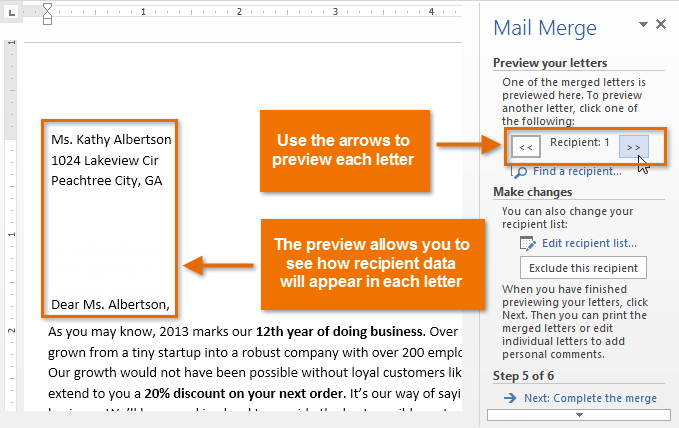
Step 5:
- Preview the letters to make sure the information from the recipient list appears correctly in the letter. You can use the left and right scroll arrows to view each document.
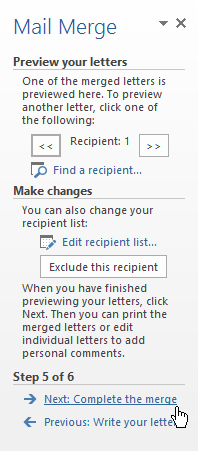
2. Click Next: Complete the merge to move to Step 6.
Step 6:
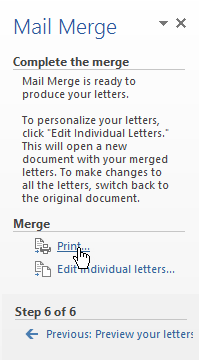
- Click Print… to print the letters.
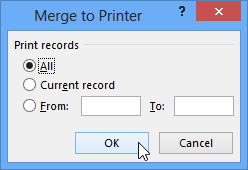
2. A dialog box will appear. Click All, then click OK.
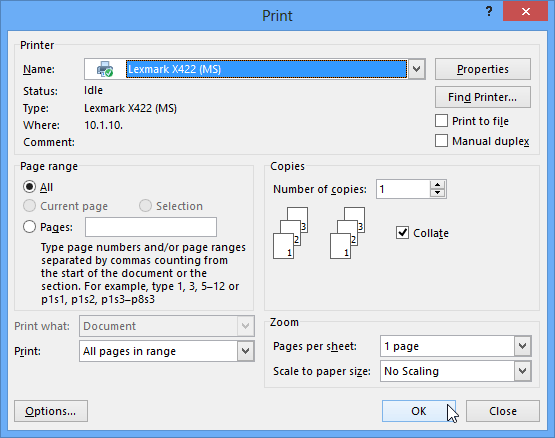
3. The Print dialog box will appear. Adjust the print settings if needed, then click OK. The letters will be printed.
Mail Merge Word 2016
Step 2: Start the mail merge
- In Word, choose File > New > Blank document.
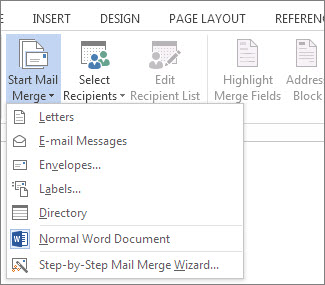
- On the Mailings tab, in the Start Mail merge group, choose Start Mail Merge, and then choose the kind of merge you want to run.
- Choose Select Recipients > Use an Existing List.

- Browse to your Excel spreadsheet, and then choose Open.
- If Word prompts you, choose Sheet1$ > OK.
Note: Now the Excel spreadsheet is connected to the mail merge document you’re creating in Word.
Edit your mailing list
You can limit who receives your mail.
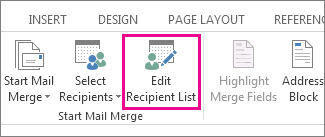
- Choose Edit Recipient List.
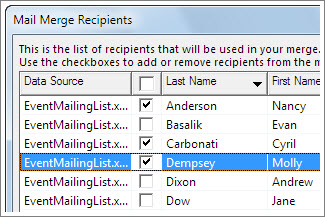
- In the Mail Merge Recipients dialog box, clear the check box next to the name of any person who you don’t want to receive your mailing.
Step 3: Insert a merge field
You can insert one or more mail merge fields that pull the information from your spreadsheet into your document.
To insert an address block for an envelope, a label, an email message, or a letter
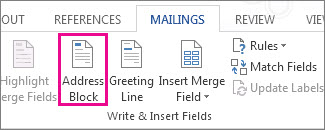
- On the Mailings tab, in the Write & Insert Fields group, choose Address Block.
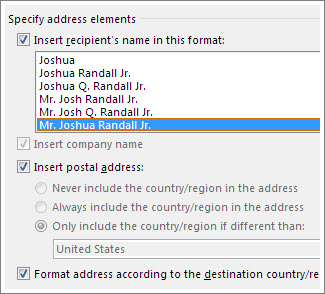
- In the Insert Address Block dialog box, choose a format for the recipient’s name as it will appear on the envelope.
- Choose OK.
- Choose File > Save.
To insert a greeting line in an email message or a letter
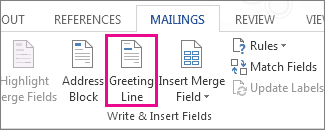
- On the Mailings tab, in the Write & Insert Fields group, choose Greeting Line.
- In the Insert Greeting Line dialog box, do the following:
- Under Greeting line format, change the salutation if necessary by choosing the greeting (Dear is the default), the format for the recipient name, and the ending punctuation (a comma is the default).and
- Under Greeting line for invalid recipient names, choose an option in the salutation list.
- Choose OK.
- Choose File > Save.
To insert data from your spreadsheet in an email message or a letter
- On the Mailings tab, in the Write & Insert Fields group, choose Insert Merge Field.
- In the Insert Merge Field dialog box, under Fields, choose a field name (column name in your spreadsheet), and then choose Insert.
- Repeat step 2 as needed, and choose Close when done.
- Choose File > Save.
Step 4: Preview and finish the mail merge
After you insert the merge fields you want, preview the results to confirm that the content is okay. and then you’re ready to complete the merge process.
- On the Mailings tab, choose Preview Results.
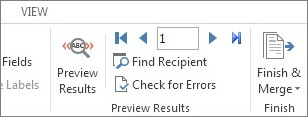
- Choose the Next
 or Previous
  record button to move through records in your data source and view how the records will appear in the document.
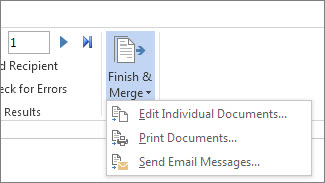
 - In the Finish group, choose Finish & Merge, and choose Print Documents or Send E-mail Messages.
Step 5: Save your mail merge
When you save the mail merge document, it stays connected to your data source. You can reuse the mail merge document for your next bulk mailing.
- Open the mail merge document and choose Yes when Word prompts you to keep the connection.
Mail Merge From Excel
Step 1 : Prepare data in Excel for mail merge
The most significant step in the mail merge process is to set up and prepare your data. You’ll use your Excel spreadsheet as the data source for the recipient list.
Listed here are some tips to prepare your data for a mail merge. Make sure that :
- Column names in your spreadsheet match the field names you want to insert in your mail merge. For instance, to address readers by their first name in your document, you’ll need separate columns for first and last names.
- All data to be merged is present in the first sheet of your spreadsheet.
- Data entries with percentages, currencies, and postal codes are correctly formatted in the spreadsheet so that Word can properly read their values.
- The Excel spreadsheet to be used in the mail merge is stored on your local machine.
- Adjustments or additions to your spreadsheet are completed before it’s connected to your mail merge document in Word.
Step 2: Start the mail merge
- In Word, choose File > New > Blank document.
- On the Mailings tab, in the Start Mail merge group, choose Start Mail Merge, and then choose the kind of merge you want to run.

- Choose Select Recipients > Use an Existing List.

- Browse to your Excel spreadsheet, and then choose Open.
- If Word prompts you, choose Sheet1$ > OK.
Edit your mailing list
You can limit who receives your mail.
- Choose Edit Recipient List.

- In the Mail Merge Recipients dialog box, clear the check box next to the name of any person who you don’t want to receive your mailing.

Step 3: Insert a merge field
You can insert one or more mail merge fields that pull the information from your spreadsheet into your document.
To insert an address block for an envelope, a label, an email message, or a letter
- On the Mailings tab, in the Write & Insert Fields group, choose Address Block.

- In the Insert Address Block dialog box, choose a format for the recipient’s name as it will appear on the envelope.

- Choose OK.
- Choose File > Save.
To insert a greeting line in an email message or a letter
- On the Mailings tab, in the Write & Insert Fields group, choose Greeting Line.

- In the Insert Greeting Line dialog box, do the following:
- Under Greeting line format, change the salutation if necessary by choosing the greeting (Dear is the default), the format for the recipient name, and the ending punctuation (a comma is the default).and
- Under Greeting line for invalid recipient names, choose an option in the salutation list.
- Choose OK.
- Choose File > Save.
To insert data from your spreadsheet in an email message or a letter
- On the Mailings tab, in the Write & Insert Fields group, choose Insert Merge Field.
- In the Insert Merge Field dialog box, under Fields, choose a field name (column name in your spreadsheet), and then choose Insert.
- Repeat step 2 as needed, and choose Close when done.
- Choose File > Save.
Step 4: Preview and finish the mail merge
After you insert the merge fields you want, preview the results to confirm that the content is okay. and then you’re ready to complete the merge process.
- On the Mailings tab, choose Preview Results.

- Choose the Next
 or Previous
  record button to move through records in your data source and view how the records will appear in the document.
 - In the Finish group, choose Finish & Merge, and choose Print Documents or Send E-mail Messages.

Step 5: Save your mail merge
When you save the mail merge document, it stays connected to your data source. You can reuse the mail merge document for your next bulk mailing.
- Open the mail merge document and choose Yes when Word prompts you to keep the connection.
Select contacts
- Open Outlook. Go to Contacts and select the people you want to mail by Ctrl + clicking the multiple names on your contact list. To effectively select the multiple names, opt for View Arrange by Categories.
- Note: Mail merge does not work with distribution lists.
- On the Home ribbon, under the Actions control group , go to Tools Mail Merge. The Mail Merge Contacts dialog box opens up.
- For the fields bulleted under Contacts, choose Only selected contacts.
- At the bottom, for Merge options “” Merge to; select Email from the drop down. A Message subject line field appears. Fill it with the common subject. Click OK.
The completed dialog box looks like this”¦
Compose the email in Word
- When you click OK, MS Word starts up and opens in a new document with the focus on the Mailings tab. You can use the default document or any other template you desire.
- The selection of recipients has already been done from within Outlook. So, we will use the Write & Insert Fields panel to insert our custom fields.
- For the word of greeting, click on Greeting Line. Configure the greeting as you want it to appear.
- To insert any other contact specific like a home address or a phone number, click on Insert Merge Field for a large drop down list.
- Write the body of the email in the Word document.
- Once you are finished with the fields you want to include, preview the final look by clicking on Preview Results and then moving through your recipients by clicking on the previous and next record buttons in the Preview Results panel.
- Click on Finish & Merge Send E-mail Messages. The Merge to E-mail dialog box opens up. Click OK.
MS Word then does the job of automatically posting the emails in a flash. You can save the document you used for the mail merge, as it also saves the link with the data source i.e. the contacts.
Mail Merge Outlook 2013
1. In Word, Click Mailings > Start Mail Merge, and then click the kind of mail merge you want to run.


In the document, click where you want to add the greeting.Click Greeting Line.

Note: If the Greeting Line command is grayed out, click Select Recipients and select the type of mailing list you’re using—Outlook Contacts, an Excel spreadsheet, or an .mdb file that you created earlier in Word. If you don’t have a mailing list yet, click Type New List to create your list in Word.
Choose the name style that you want to use, and set other options. Once done, select OK.

Tip: To make certain Word locates the names and addresses in your list, click Match Fields. Check that the fields you want appear in the list. If a field you want says Not Matched, click the drop-down list for that field and then click the column name that matches that column in your list.
To make sure the field is formatted the way you want, highlight the whole field, including the marks at each end.
Click Home, and then check the font and font size.
These same steps work for adding addresses to a mailing labels document—all at once, instead of separately inserting the name, street, city, and all the other parts of the address.
Just click Address Block instead of Greeting Line.
Note: If the Address Block command is grayed out, click Select Recipients and choose the kind of mailing list you’re using—Outlook Contacts, an Excel spreadsheet, or an .mdb file that you created earlier in Word. If you don’t have a mailing list yet, click Type New List to create your list in Word.Word gives you options for making the name on the address more formal or more informal.Tip: To make mailing labels single spaced, select the Address Block field, click Page Layout and enter 0 in the Before and After boxes under Spacing.If you would like to add a more customized greeting or other information from your mailing list, you can add fields one a time.Click in your document where you want to add the mail merge field.Click the arrow next to Insert Merge Field, and then click the field name.If you don’t see your field name in the list, click the Insert Merge Field button.Click Database Fields to see the list of fields that are in your data source.Click the field you want to add.Click Insert.
7. When your document is ready, choose Preview Results, and then choose the Next or Previous Previous record button to see each specific copy of the document.
8. To complete the merge process, in the Finish group, choose Finish & Merge, and then choose Print Documents or Send E-mail Messages. If you are merging to email, please be sure to include a subject line.
Save your mail merge
When you save the mail merge document, it stays connected to your datasource.
To reuse your mail merge document
Open the mail merge document and choose Yes when Word prompts you to keep the connection.
To edit your mailing list
Open the mail merge document and choose Edit Recipient List to sort, filter, and choose specific addresses.


