How To Create & print labels in Word 2010
Create and print a single label
- Start Word.A blank document opens by default. Leave it open. If you close it, the commands in the next step are not available.
- On the Mailings tab, in the Create group, click Labels.

- In the Address box, type the text that you want.If you want to create a label for an address that is stored in the electronic address book that is installed on your computer, click Insert Address
 .
. - To change the formatting, select the text, right-click the selected text, and then click Font or Paragraph on the shortcut menu.
- To select the label type and other options, click Options.
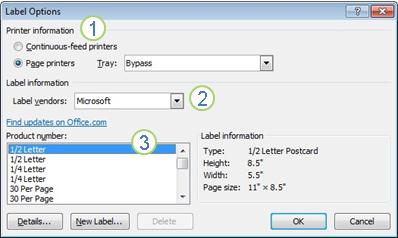
- In the Label Options dialog box, make your choices, and then click OK.
 1 The type of printer that you are using to print labels2 The supplier that produced your label sheets3 The number that corresponds to the product number listed on your package of label sheets
The product number for my label sheets doesn’t match any of the choices in the Label Options dialog box
You can still print your labels. You just have to do some customizing.
- Measure the labels on the sheet that you have, and note the measurements and how many labels fit on a single sheet.
Note: Measure the labels carefully. The actual label size might be smaller than the size that is indicated by the label manufacturer. For example, a 1-by-2-inch label might actually be 15/16-inch high and 1 15/16-inches wide.
- In the Product number list, click a label type that is similar in size to your labels.If you don’t see the label type that you want in the Product number list, you may be able to use another of the listed labels, or you can create a new label size.
- Click Details, and then compare the label dimensions and the number of labels per sheet (for labels printed on laser and ink-jet printers) or the number of columns on the label form (for labels printed on dot-matrix printers).
- Do one of the following:
- If the dimensions and label layout match those of your labels, use the selected label.
- If the dimensions and layout do not match yours, click Cancel, and continue to step 5.
- In the Label Options dialog box, click the printer type (either Continuous-feed printers or Page printers), and then click New Label.
- Type a name in the Label name box, select the height, width, margins, and other options for your label, and then click OK.The new label appears in the Other/Custom category. The next time you use your custom labels, be sure to select Other/Custom in the Label vendors list.
- Measure the labels on the sheet that you have, and note the measurements and how many labels fit on a single sheet.
- After you select the options that you want, click OK.
-
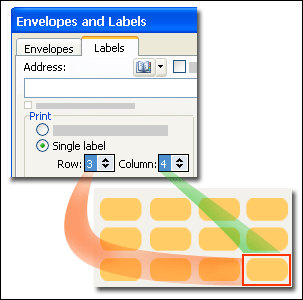
Under Print, click Single label. Then in the Row and Column boxes, enter the numbers that match the numbers of rows and columns on the label sheet for the label that you want to print.

- Click Print.
Recent Posts


